Implementation of JavaScript in Salesforce
JavaScript is the most commonly used programming language amongst the software developers
worldwide, with
more than 63.6% of respondents stating that they recommend JavaScript as their first language for
developing and building software applications.
JavaScript, an important part of software development, is used widely in Salesforce for development
like in Lightning Web Components (LWC) or Aura Components, for debugging & error
handling, Asynchronous Programming, and writing test classes for LWC. Developers who are new
to the Salesforce technology can implement the features of JavaScript to leverage their skills and
build powerful functionality to build highly scalable Salesforce applications.
This blog talks about all the essential JavaScript components that one can implement in Salesforce for
profound development skills. Let’s get in!
Why is JavaScript important for Salesforce Developers?
JavaScript is essential for Salesforce Developers as they can use JavaScript to add interactive elements to
their applications, enhance user experience, and build complex logic that is very difficult with normal
Salesforce tools. Besides, many businesses and companies can use this to build more sophisticated and
customized applications for their customers.
In General, the addition of JavaScript language support to the Salesforce Platform is an effective development
for everyone. It opens up new possibilities for developers and specialized professionals who are eager to
build business solutions and web applications on the Salesforce platform.
Variables, Types and Collections in Lightning Web Components With JavaScript:
let, var & const Variables -
Variables play the most fundamental part of JavaScript. In JavaScript, you can declare variables with var, let and const -
- “var” and “let” variables can be reassigned to new values.
- The values declared by “const” variables cannot be assigned new values as they are declared constant.
- The “let” keyword has a block-level scope, whereas the “var” keyword has global-level scope.
- The “const” declared variables remain constant throughout the execution of the program.
var : The var keyword was the very traditional way of declaring variables. It has a global-level
scope.It
means that it can be accessible within the block `{}` where it has been declared.
let : The `let` keyword allows you to declare and store variables within the block scope. It means it
has
block-level access and can be accessed within the block. Variables declared with `let` can be reassigned to a
new value.
const : The `const` variables also have a block-level scope. The value assigned with `const` variables
cannot be changed or reassigned.
Differences between var, let, and const variables:
| var | let | const |
|---|---|---|
| The scope of `var` variables is global | The scope of `let` variables is block scope | The scope of the `const` variable is block scope |
| It can be updated and re-declared within the same scope | It can only be updated but cannot be re-declared within the same scope | It can neither be updated nor be redeclared in any scope |
| It can be declared without initialization | It can also be declared without initialization | It cannot be declared without initialization |
| It can be accessed without initialization as its default value is “undefined” | It cannot be accessed without initialization, as its default value is not “undefined”. If declared without initialization, it will give “referenceError” | It cannot be accessed without initialization |
Code Instance:
|
// Declaring Variables using var, let, and const // Using var console.log(x); // Output: 10 if (true) { var x = 20; // The value of x is changed globally } console.log(x); // Output: 20 // Using let console.log(y); // Output: 30 if (true) { let y = 40; // The value of y is limited to this block } console.log(y); // Output: 30 (The value of y remains unchanged) // Using const console.log(pi); // Output: 3.14 // pi = 3.14159; // This will result in an error, as const variables cannot be reassigned |
Understanding Data Types in JavaScript:
JavaScript supports various data types which can be used to declare types to variables.
● Numbers: Represent Numerical Values like integers and decimals
● String: Represent String values enclosed in single or double quotes
● Boolean: Represents true or false values
● Arrays: Represents a List of Values, enclosed in square brackets `[]`
● Objects: Represents a collection of key-value pairs enclosed in curly braces `{}`
Code Instance:
|
// Understanding Various Data Types in
JavaScript |
Manipulating Data with loops, iterations, and Array Methods in Lightning Web Components:
Efficiently manipulating data with loops and array methods is an essential skill in JavaScript for Lightning Web Components (LWC) development.
To iterate over a list in LWC, we use two types of loops: `for each` and `iterator`
Whenever we use forEach() or iterator() in LWC, we need to use the key
directive on the element we are iterating. This key directive gives the unique ID for each iterating element
in the loop.
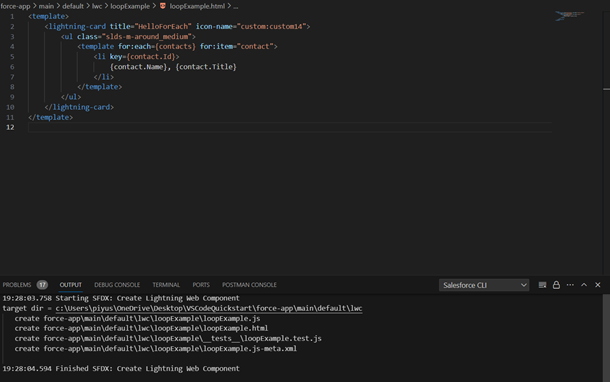
- for:each
● When using the for:each directive, use for:item="currentItem" to access the current item
● To assign a key to the first element in the nested template, use the key={uniqueId} directive
● You can use for:index="index" to access the current item index; it is optional
Code Instance:
HTML Code -
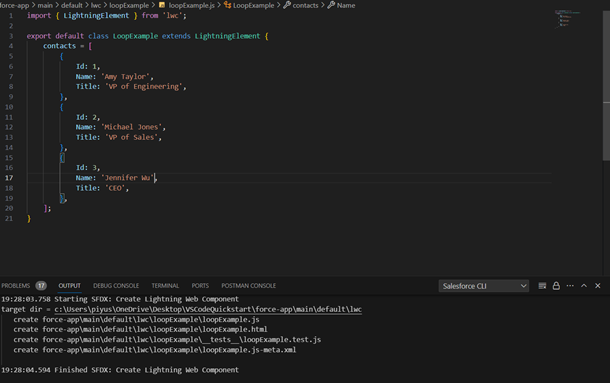
JS Code -
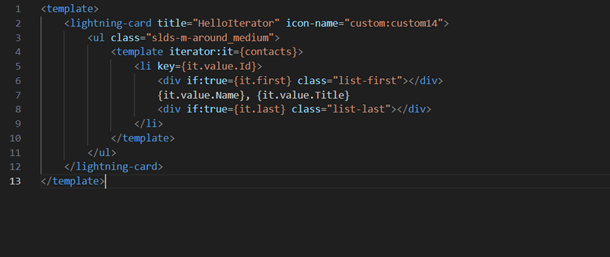
- Iterator
If one wishes to add special behavior to the
first or
last item in a list, use the iterator directive,
iterator:iteratorName={array}. Use the iterator directive on a template tag.
Use iteratorName to access these properties:
● value—The value of the item in the list. Use this property to access the properties of the array. For example, iteratorName.value.propertyName
● index—The index of the item in the list
● first—A boolean value indicating whether this item is the first item in the list
● last—A boolean value indicating whether this item is the last item in the list
Code Instance:
HTML Code -
Implementing Array Methods in Lightning Web Components:
In Lightning Web Components and Aura Components, JavaScript is used to handle various complex tasks with less code and more efficiency. In LWC, one can utilize JavaScript Array methods like forEach, map, filter, some, find, etc., to handle array lists or objects very effectively.
- Push() and Pop(): The
push()method is used to add an element to an array while thepop()method is used to remove the last element from an array.
|
let fruits = ["Banana", "Orange"]; |
-
shift():
The
shift()method is used to remove the element from the beginning of the array.
|
let fruits = ["Banana", "Orange"]; |
- unshift(): This method, similar to the push() method, adds elements to the beginning of the array.
|
let fruits = ["Banana", "Orange"]; |
- forEach(): This method is used to iterate each element of an array.
|
options = [ |
- map(): This method returns a new array populated with the results of the provided function for every element in the array.
|
this.options = this.options.map(opt => {
return {...opt, "checked": false}}); |
- filter(): This method returns a new array after filtering the elements based on the conditions passed for every element in the array.
|
this.options.filter(element =>
element.label.startsWith("Ban")); |
- find(): This method is used to return a value present in the array based on some conditions.
|
this.options.find(element =>
element.label
== "Banking"); |
- concat(): This method is used to merge two arrays.
|
let arr1 = ['1', '2', '3']; let arr2 = ['4', '5', '6']; let arr3 = arr1.concat(arr2); console.log(arr3); |
- sort(): This method is used to sort elements of an array in ascending or descending order.
|
arr1.sort(); |
- every(): This method ensures that every element in the array is passed for the specified condition provided by the function.
|
let
num = [
1,
2,
3,
4,
5,
6
]; |
Synchronous Vs Asynchronous Programming in Lightning Web Components:
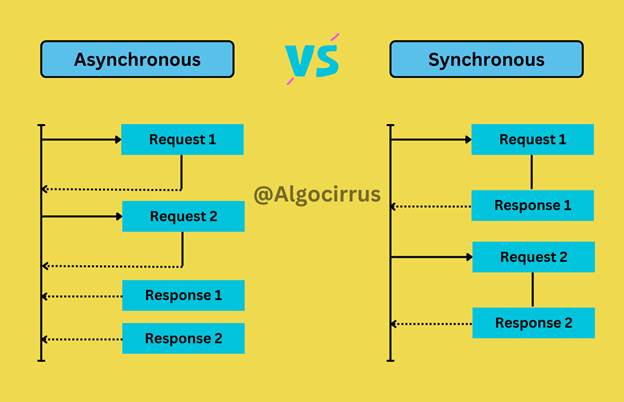
Asynchronous programming is very essential for web development and they offer a wide range of functionalities for Salesforce developers to build scalable and highly robust applications for their customers.
Simply put, asynchronous programming means executing multiple tasks or jobs concurrently in the background without waiting for other tasks to finish. In synchronous programming, the jobs/tasks are executed one at a time.
For example, computer programs work asynchronously while
handling large chunks of data. In a computer program, asynchronous programming
allows a program to work on multiple tasks simultaneously instead of completing
one task before moving on to the next. This can make the program get more
things done in a shorter amount of time.
Another example could be that - a program can send a request to a server while
handling user input and processing data, all at the same time. This way, the
program can run more efficiently.
To run a code asynchronously in JavaScript, we can use async/await, promises,
and callback methods. Let’s discuss some code examples.
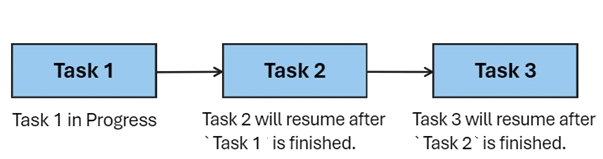
JavaScript is a single-threaded programming language. That means it executes
code one at a time. For example - a computer program will execute one thing at
a time only after some specific tasks have been finished. It will not move on
to other tasks before the completion of one task.
Code Instance:
|
// Define three functions |
In the above example, the output will be as follows:
|
Task
1 |
The order of execution of synchronous programming is very simple and straightforward.
Synchronous Programming
However, synchronous programming can be problematic in certain situations, particularly when
dealing with tasks that take a significant amount of time to complete.
For example - let's say that a synchronous program in JavaScript performs a task that requires
waiting for a response from a server. The program will be stuck waiting for the response and cannot do
anything else until the response is returned. This is known as blocking, and it can lead to an application
appearing unresponsive or "frozen" to the user.
Asynchronous Programming
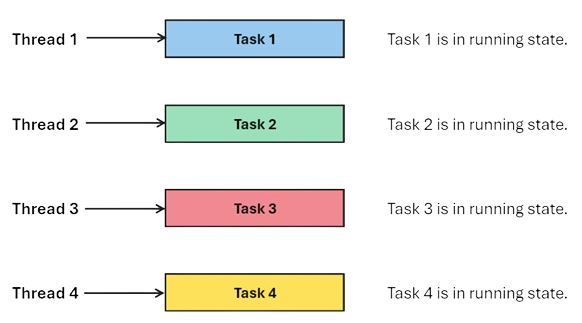
This is where Asynchronous programming comes into play.
Asynchronous programming in JavaScript enables the program to start a potentially long-running job and still
be able to be responsive to other events while that task runs, rather than having to wait until that task
has finished. Once that task has finished, the program is presented with the result.
Asynchronous programming allows the program to run on other tasks in the background while waiting for
external events, such as network requests, receiving responses from the server, etc.
For example, while a program retrieves data from a remote server, it can continue to execute other tasks
such as responding to user inputs.
Code Instance:
Here is the code example demonstrating the Asynchronous programming in JavaScript using the `setTimeout()` method:
|
console.log(
"Start of script"
);
function
() { |
Here is the code result:
|
// Code Output
Start of the script |
In this example, the setTimeout() method
executes a function after a specified time. The function passed to setTimeout() will be executed asynchronously, which means that the program
will continue to execute the next line of code without waiting for the timeout to complete.
As it can be seen, the console.log("First timeout
completed") will be executed after 2 seconds. Meanwhile, the script continues to execute the next
code statement and doesn't cause any "blocking" or "freezing" behavior.
Promise in JavaScript:
In JavaScript, one can execute asynchronous code with the help of Promises,
async/await, and callbacks. These are the ways through which JavaScript can execute code asynchronously. So,
let’s learn what Promises are in JavaScript and how they can be executed.
A Promise is, generally, an organized way of handling asynchronous
tasks in JavaScript. It is like a placeholder where we tell the JavaScript engine to execute a “Promise” to
perform a future action and notify you once it’s completed.
Creating Promise -
To create a promise, one would need to first create its instance by calling the promise() constructor.
The promise constructor calls an executor() method, which again takes two arguments as functions.These arguments are called resolve() and reject().
|
const
promiseExample
=
new
Promise
(
(resolve, reject)
{ |
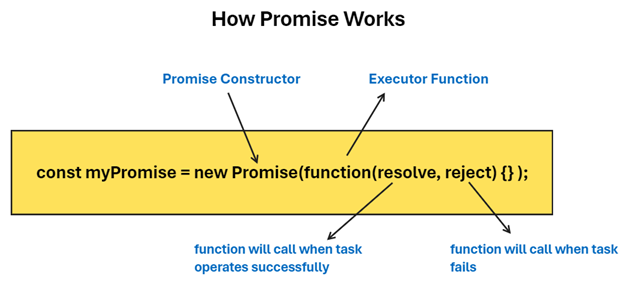
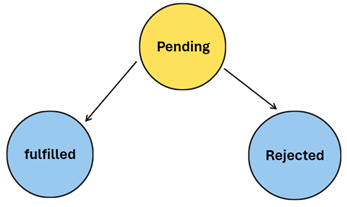
The Promise has 3 states:
● Pending : initial state, neither fulfilled nor rejected. This is the state in which initially a new instance of a promise is created.
● Fulfilled : This means that an operation was completed successfully.
● Rejected : This means that an operation failed.
Here’s the code example that will help to consume a promise.
Code Instance:
|
myPromise
|
Async/Await in JavaScript:
In Lightning Web Components, async/await are simply the constructs that are used for
handling asynchronous programming. Async/await is built on top of promises and they are easier to handle
asynchronous tasks in JavaScript.
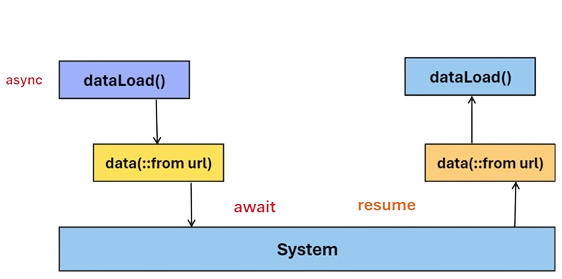
The Async keyword is used to define an asynchronous function, which returns a
promise. Within this function, one can use the await keyword to pause the execution of the function
until a promise is resolved or rejected. This makes the code look more like synchronous code, as the execution
is blocked until the promise resolves.
How to Use async/await in LWC:
Since we have learned how to use async/await, let’s look at an example of how to implement async/await in the LWC component:
|
async function fetchData() {
|
In the above example, we're using the fetch API to request an API endpoint. We're using the await keyword to pause the execution of the function until the promise returned by the fetch API is resolved. Once the promise is resolved, we parse the response body as JSON using the response.json() method. Finally, we return the resulting data.
Common Use Cases for async/await:
● Executing HTTP requests
● Waiting for an asynchronous response to finish
● Processing multiple promises in parallel
|
import { LightningElement } from 'lwc'; |
In the above example, the connectedCallback() lifecycle hook in LWC is declared
as `async`, which allows us to use the `await` keyword on the fetchData()
function to fetch the data from a resource while waiting for the promise to finish.
The try-catch block is used to handle the error that may be caused during the execution of the code.
Error Handling in Lightning Web Components:
Error Handling is the most crucial aspect of Lightning Web
components as they ensure that the web applications handle both expected and unexpected results very
efficiently and gracefully.
Handling Errors on the Server Side -
To handle errors on the server side of the application, we have to handle errors by writing custom code logic. These code logic are generally written in Apex.
Apex methods can throw a variety of exceptions. These include Query exceptions, DML exceptions, and general exceptions from business logic like parsing, type conversion, and so on.
The best way to handle errors is to wrap them inside the try-catch block. We generally write the code where we expect the error inside the try block, and the catch block is used to handle and display the error thrown by the try block.
Code Instance:
|
try {
} catch(Exception e) { throw new CustomException(e.getMessage()); }
public class CustomException extends Exception {
} |
Handling Errors from Asynchronous Operations like Wire, Imperative Methods and Promises:
In the case of wired methods in LWC, we can handle and show errors in 2 ways. The first is when we get data and we can check for errors in the try-catch block. Secondly, the other condition is where we get the error itself by the wire adapter.
Code Instance:
|
@wire(getContactList) |
To handle Imperative method errors, we use the .then() and .catch() blocks. After getting data from the Imperative method call, we have to perform then() and catch() blocks to handle data and errors effectively.
Note: We can also use the finally() block, which will execute after every try or catch block.
Code Instance:
|
getContactList() |
One more important thing to understand is what are the payload options we have in the
error body. The error body payload contains the below attributes:
Here are some of the breakdowns for diversity, equity and inclusion in the workplace:
● name – Indicates the type of exception thrown
● message – Contains the error message
● stack – Contains the stack trace
Code Instance:
|
try { |
Custom errors have a different error body structure than standard error bodies.Here are a few properties
of
the custom error object:
Code Instance:
|
//Apex Code //JavaScript Code |
Testing Lightning Web Components - Jest:
Jest is the JavaScript testing framework
used to ensure the correctness and authenticity of the JavaScript codebase. It helps to write test classes
for Lightning Web Components in a comprehensive and approachable manner that gives results quickly.
Jest tests work only with Lightning web components, they don’t work with Aura components.
Jest tests help to:
● Test a component in isolation
● Test a component’s public API (@api properties and methods, events)
● Test basic user interaction (clicks)
● Verify the DOM output of a component
● Verify that events fire when expected
Writing Jest Test for Lightning Web Components:
Lightning Web Components Tests are written in local JavaScript files. Besides, they have to be committed to the version control system along with the Lightning Web Components as they are not saved in Salesforce. One can use the Salesforce CLI command SF Force Lightning LWC Test Create to create a test directory and a boilerplate test file within the directory.
Example Command: Create Test Directory and File for LWC -
|
sf force lightning lwc test create -f force-app/main/default/lwc/{LWCComponentName}/{LWCComponentName}.js |
In Lightning Web Components, Jest frameworks run the JavaScript files in the _tests_ directory. Test files must end with .test.js
Here is an example Jest file for better understanding.
HTML code - helloWorldJestTest.html
|
<template> |
JavaScript Code - helloWorldJestTest.js
|
import { LightningElement } from'lwc'; |
helloWorldJestTest.js-meta.xml file -
|
<?xml version="1.0" encoding="UTF-8"?> |
helloWorldJestTest.test.js -
|
import { createElement }
from'lwc'; |
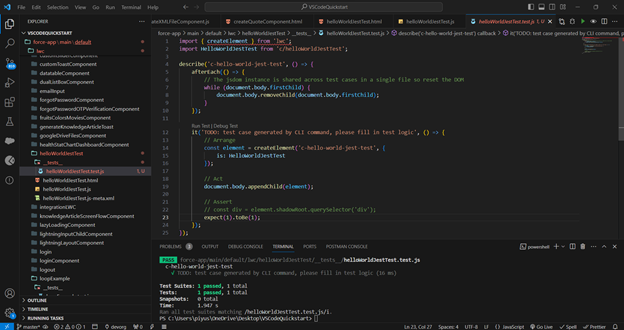
Run Test -
The below command is used to run the test case in the VS Code Terminal:
`npm run test:unit -t helloWorldJestTest.test.js`
Output -
After running the test cases one will see the following output in the terminal indicating that the tests have been passed with assertions.

Understanding the Structure of the Jest Framework in LWC:
Imports -
This method is only available for tests. The test imports the createElement method. Code must import the component to test later to create the component under test.
Describe Block -
This block defines a test suite. A test suite contains one or more tests that belong together from a functional point of view.
Reset The DOM with afterEach()
The jest `afterEach()` method resets the DOM at the end of each test.
Every test has a single instance of DOM, known as `jsdom`, and changes aren’t reset between tests. As a best practice, it’s important to clean up between tests so that one test's output doesn’t affect another test.
it() block -
The it() block is an alias for a test and it is used to describe a single test. A test represents a single functional unit that you want to test. Write `it` to describe the expected behavior of that function.
beforeEach() and afterEach() -
If we have to execute test classes before executing test cases or after test cases, then we can use the `beforeEach()` and `afterEach()` blocks.
beforeEach() -
This
method will execute before each test case.
afterEach() -
This method will execute after each test case.
Create Test Component -
The `createElement()` method is used to create an instance of the component to test.
Add Test Component to the DOM -
The `appendChild()` method is used to insert the component into the DOM and the `connectedCallback()` and `renderedCallback()` methods are called.
Asserts -
Finally, the expected statement is an assertion of a success condition.